Your marketing emails to contacts are sent by default from a sending domain that is provided by Fello. This sending domain might look something like this - info@32edf4f2f2.hf401.com, which might not be easily recognizable by your contacts, and may even be marked as spam.
To ensure better email deliverability, you can use your own sending domain for emails. This way, contacts can easily recognize your brand name in the From email address, and your emails will have a higher chance of landing in inboxes.
In this guide:
Authenticate Your Domain Using Entri
You can start using your own email sending domain by authenticating it. Here’s how to get started:
- Go to Settings > Domains & URLs > Email Sending Domain.
- Enter your domain’s name.

- Click Authenticate.
- Click Continue in the popup that appears. (Fello uses Entri, which simplifies the process of authenticating your domain. You can also choose to set up your domain manually, step-by-step, if required.)

You will now be directed to Entri’s site, where you will be guided to enter your domain provider’s credentials, and Entri will automatically set up your domain records for you.
Once you’ve completed the steps on Entri, you will be directed back to Fello. Now, you must wait for Fello to verify the domain records that were added by Entri. This process usually take just a couple of minutes, but can sometimes take up to 48 hours depending on your domain provider.
You’ll receive an email notification when the authentication has been completed, and your email sending domain will start to be used for new emails automatically.
You will also receive an email notification if the authentication failed. In this case, you can return to the Domain screen in Fello to retry the authentication via Entri, or try setting up your domain records manually.
Authenticate Your Domain Manually
You can authenticate your domain manually by adding the Fellow-provided domain records by yourself in your domain provider’s website. Here’s how:
- Go to Settings > Domains & URLs > Email Sending Domain.
- Enter your domain’s name.
- Click Authenticate.
- Click “Or manually authenticate your domain”

- Select your DNS provider.

- Click Next.
- Open a new tab and sign in to your DNS provider’s website.

- Click Next.
- Follow the on-screen instructions to add CNAME records in your DNS provider’s website.

- Click Next.
- Follow the on-screen instructions to add TXT records in your DNS provider’s website.

- Click Next.

Click Check Status to check the status of authentication, or close the panel and wait for an email that notifies your whether the authentication has been successful or not. If successful, your authenticated sending domain will start to be used automatically for emails.
View Domain Records
You can view all of the Fello-provided domain records, and their status at any time during the authentication process.
- Go to Settings > Domains & URLs > Email Sending Domain.
- Click the 3-dot menu.
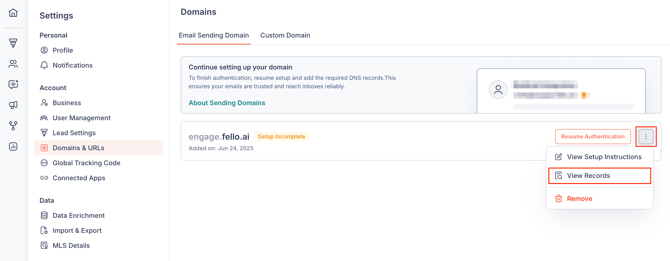
- Select View Records.
Here you can view and check the status of all the records. 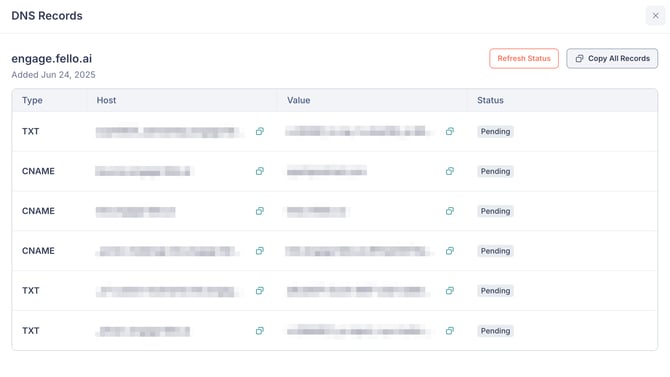
Records can have the following statuses:
- Pending - The records have not yet been verified.
- Verified - The records have been verified and are functional.
- Failed - The records could not be verified, either because they are missing, or were added incorrectly.
Your domain will not be authenticated if any of the records are in the Failed status. If any of your records fail to be verified after your domain has been authenticated, then you will have to restart the authentication process.
Edit Sender Email
Once you’ve authenticated your domain, you can freely change the sender email address as required.
- Go to Settings > Domains & URLs > Email Sending Domain.
- Click the 3-dot menu.
- Select Sender Email Address.
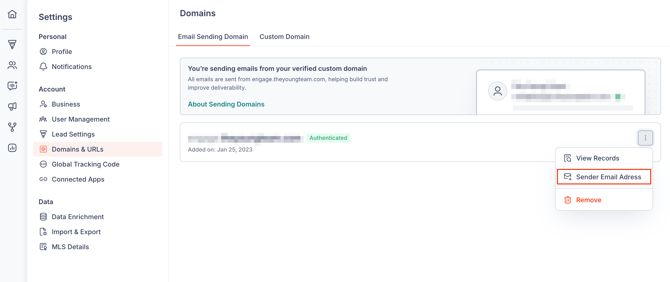
- Enter the new sender email address that you want to use.
- Click Save.
This email address will be used for all outgoing emails sent from your account in the future.
Remove Sending Domain
To remove your email sending domain:
- Go to Settings > Domains & URLs > Email Sending Domain.
- Click the 3-dot menu.
- Select Remove.
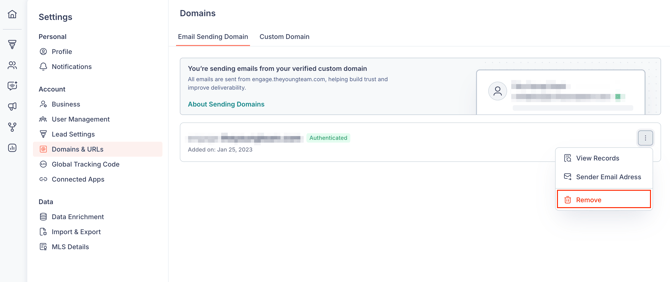
- Confirm in the popup that appears.
If you remove an authenticated domain, then you will go back to using a Fello-provided domain and you must perform the authentication process from the start the next time.