- Introduction
- Viewing Leads
- Viewing Form Submission Details
- Managing Leads
- Automate Lead Routing
- User Mapping
Introduction
Your contacts become leads in Fello when they submit forms for the first time. Since each lead may have different requirements and would have started their journey with you at different times, you can set different lead stages to effectively track where each lead currently is in your sales or outreach pipeline.
Note: You can also set lead stages for contacts without any for submissions, if required.
The following sections in this guide will cover how to view and manage leads in Fello.
Viewing Leads
You can view all of your leads in the dedicated Leads module from the left sidebar.
Each lead in Fello can be in one of 4 stages:
- New: This stage is set automatically when a contact submits a form for the first time, and can be used to identify fresh leads in your database.
- Follow-Up: This stage can be used to identify leads that require a follow-up task such as a call, or are currently being followed up.
- Qualified: This stage can be used to indicate that a lead has agreed to move forward, and your users can approach them to close deals.
- Disqualified: This stage can be used for leads who have confirmed that they’re not interested in moving forward, indicating to your users that they do need to be pursued further at the moment.
Apart from the “New” stage which is set automatically, all the other lead stages must be set manually as your leads progress through your pipeline.
You can view the total number of leads that are in each stage at any time. 
You can switch between a list view and Kanban view for leads (the default is Kanban). To do this:
- Select the view that you want to use.

Tip: You can use the Kanban view to change lead stages easily by dragging and dropping leads across stages. 
Viewing Form Submission Details
Each lead can have multiple form submissions. Here’s how to view details of each submission:
- Click on a lead from the Leads module.
- Navigate to the Submissions tab.

- Click View Submission next to a submission.
Here, you can view various details about the submission as when the form was submitted, the lead type, property details, and contact details that were submitted along with the form.
Tip: If you want to view details of a lead’s most recent submission, you can do so by clicking View Submission directly from the list page in the Leads module.
Managing Leads
While you can perform actions such as changing tags and assigned users directly from the Leads module, it is important to note that lead records are the same as contact records, so making these changes will apply in the Contacts module as well.
You can click on the 3-dot icon next to a lead to perform actions like changing the assigned user and updating tags.
This section will explain further about the following actions:
Assigning Leads
Changing the assigned user of a lead is the same as changing the assigned user of a contact, i.e., a lead and a contact can only have the same assigned user. So, if a contact was assigned to a user, and that contact has become a lead, the assigned user will remain the same.
You can change the assigned user directly from the Leads module:
- Click on the 3-dot icon next to a lead.
- Select Edit Assigned User.

- Search for the user you want to assign to this lead, or select Unassign to remove the currently assigned user.

- Click Update.
The assigned user has been updated.
Note: You can also assign leads automatically by automating lead routing.
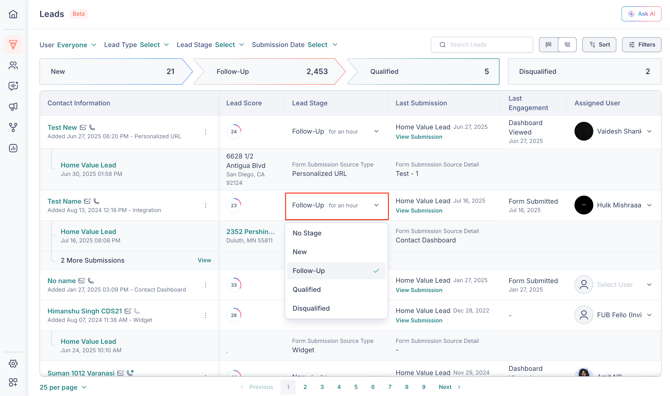
Changing Lead Stages
To change the lead stage:
- Go to the Leads or Contacts module.
- Select a lead stage directly from the Lead Stage column.
(or) - Select a contact.
- Click the Edit (pencil) icon under Stage.

- Select the current stage of the contact.
- Click Save.
🗒️ Note: You can select No Stage to remove the currently set lead stage. When a contact does not have any lead stage, they will not appear in the Leads module.
💡 Tip: The leads module supports a Kanban view that lets you drag and drop leads between stages.
You can also use workflows to update lead stages automatically. This can be particularly useful when you want to update a lead stage in Fello based on the stage in your CRM, or vice versa. Here's what an example of such a workflow might look like:
This way, if you've integrated with a CRM like BoldTrail, Follow Up Boss, or Sierra, you can use the CRM Stage Updated event to update the lead stage in Fello accordingly.
Automate Lead Routing
You can configure lead routing rules to assign leads or contacts to users automatically. Some rules are configured by default. To get started:
- Go to Settings > Lead Settings.
- Navigate to the Automate tab.

Here, you will see rules with different triggers, such as how to route leads when a form is submitted or when a contact drops off without submitting a form.
2 rules are configured by default and will always remain active:
- Personalized URL Assignment Rule: If the source of a lead was a Personalized URL, then this rule will assign that lead to the user associated with that URL.
- Website Subdomain Assignment Rule: If the source of the submission or drop-off was associated with a particular user’s subdomain, then the contact will be assigned to that user.
To create a new lead routing rule:
- Click + Create Rule next to the required trigger.

- Enter a name and description for the rule.

- Click Save.
- Click Contact Matches Filter and then + Add Filter to filter out contacts to whom this rule applies.

- Search for filters and apply them as required. Close the filter configuration panel when you’re done.

- Click Save for your applied filter criteria.
- Click the Rotate Assigned User block.

- Choose if you want to rotate users even if the contact already has an assigned user.

- Select the users between whom you want to rotate assigned contacts on a round robin basis. (You can select just one user too.)

- Click Save.
- Click Turn On Rule to activate it.

You can also mark an existing active rule as inactive or delete it by clicking the 3-dot icon.
User Mapping
You can map details of users in your Fello account with users in your CRM to ensure that leads are assigned to the same users across both platforms.
To create a new user mapping:
- Go to Settings > Lead Settings.
- Navigate to the User Mapping tab.

- Click Map New CRM User.

- Enter the required details and click Add.

The user mapping has been created.
You can also click Import to add user mapping in bulk from a CSV file.
You can also delete user mappings in cases such as employees leaving your organization:
- Select the users for whom you want to delete mappings.

- Click Delete, and confirm in the popup that appears next.